
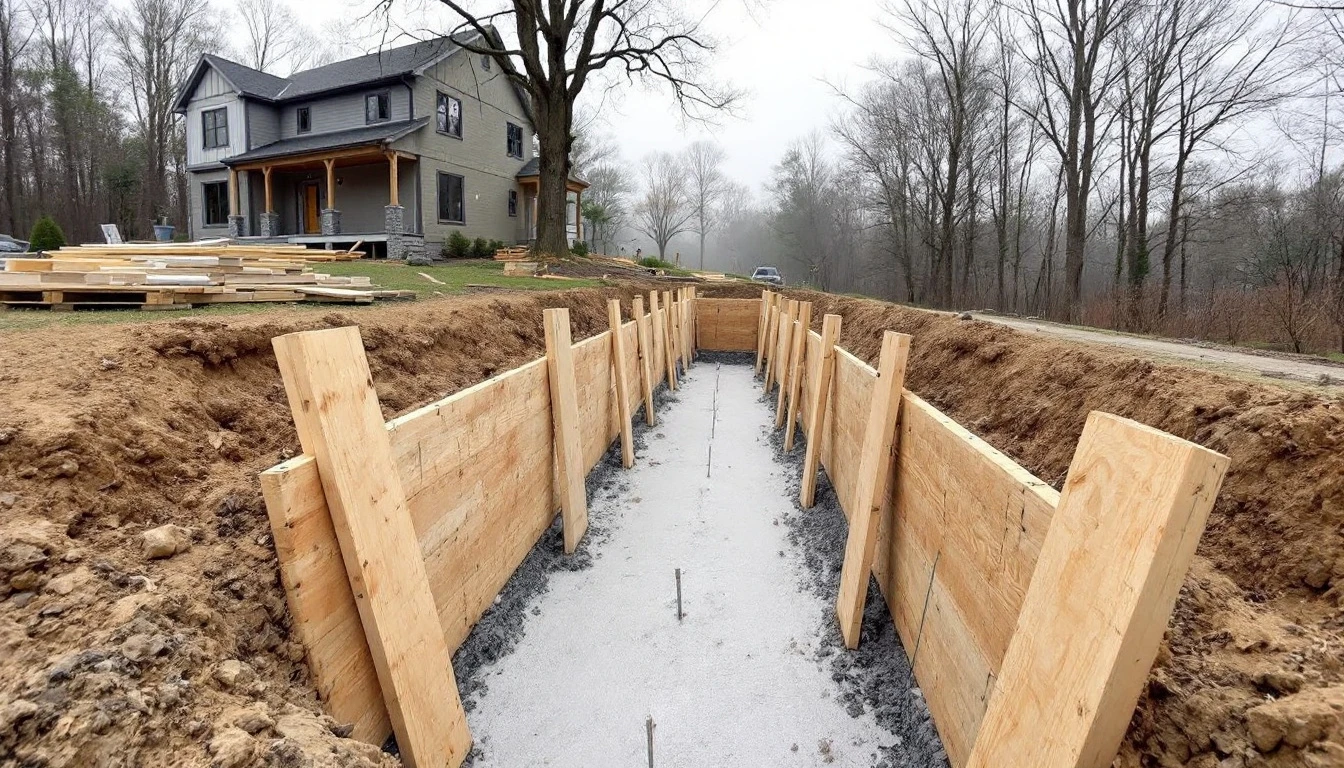
Here's something a lot of homeowners don't realize until it's too late, the driveway you end up with has almost nothing to do with the concrete truck. It's decided days earlier, when someone is out there with stakes, string, and a level, setting up the forms. Get that part wrong, and no amount of skill with a trowel will save you. Get it right, and the pour itself is almost the easy part. This guide walks through how driveway forms actually work, what they're typically made of, how the site gets prepped, and the things worth double-checking before, during, and after the concrete goes down.
Why the Forms Matter
A form is just a temporary wall, something to hold wet concrete in place while it cures. But it does more than contain a mess. It's setting the width, the length, the slope, and the edge line. Every dimension your finished driveway might have, has been already decided by the form's position.
Driveways take a beating that other slabs don't. Cars roll over them, water runs across them, and if the grade is off even slightly, that water heads toward your garage instead of away from it. So the framing has one job it really can't fail at, that is, staying exactly where it's placed.
Even a slight bow in a form board shows up as a wavy edge in the finished slab. And a form set at the wrong height throws off how the driveway meets the garage floor, the sidewalk, or the street. A good framing comes down to accurate layout, solid support, and checking your elevations more than once.
Step 1: Nail Down the Plan Before Any Lumber Gets Cut
Before you buy a single board or turn a shovel of dirt, you need to know the final width, length, slope, and where the driveway ties with garage, street, sidewalk.
Don't skip the permit and utility check. Setbacks, curb cuts, and drainage rules differ from town to town, and if digging is involved, get the utility lines marked first. It's a phone call, not a hassle, and it beats hitting a gas line.
Drainage is where a lot of driveways quietly go wrong. Water needs somewhere to go that isn't the base of your garage door. Exactly how much slope that takes depends on your lot, your climate, and the design, which is why elevations should be worked out before a single stake goes in the ground, not figured out on the fly.
Step 2: Pick the Right Material for Your Forms
Most residential driveways use straight, rigid boards held up by stakes. Lumber wins out because it's easy to source, cut, and adjust on site.
Lumber
Standard construction-grade boards handle a conventional straight-edged driveway just fine, as long as the dimensions match your slab thickness. Wet concrete pushes back harder than people expect, and a weak board will lose that fight.
Plywood for Curves
If the driveway sweeps or curves, lumber won't bend the way you need. Plywood will, as long as it's staked and braced properly. Tighter curves need tighter staking, the sharper the bend, the more the material wants to spring back to straight.
Metal and Reusable Systems
These show up more with contractors doing repeat work, since they hold a straight line reliably and can be reused job after job.
Which one's right for you depends on the shape you're going for, the slab specs, what equipment is being used, the budget.
Step 3: Lay Out the Driveway and Set the Grade
This is where a lot of the real precision work happens. Pick a solid reference point like the garage slab edge is a common one and run string lines from there to mark the boundaries. For a rectangular layout, check your corners with a different method to confirm they're actually square, and on bigger driveways, check elevations at several points along the run, not just at the corners.
Step 4: Get the Subgrade Ready First
No form, however well-built, can make up for a bad base underneath it. Dig out to the right depth and clear out anything that doesn't belong like loose soil, roots, organic debris. Compact what's left before adding base material. Most driveways sit on a layer of compacted gravel, and how thick that layer needs to be depends on your soil type, drainage, climate, and what the driveway will be carrying. A properly compacted base is cheap insurance against settling later, especially if you're dealing with clay-heavy or expansive soil, or a spot that floods easily in winter.
Step 5: Build and Anchor the Forms
Once the grade's set and the base is in, it's time to actually position the boards along your layout lines. The top edge of each form marks where the finished concrete surface will sit, so check that height with a level or laser, not by eye. Stake everything securely, and brace the corners and curves especially well, since that's where the pressure from the pour concentrates first.
Before the truck shows up, walk the line and check:
- Forms are straight and lined up correctly
- Corners are joined securely
- Stakes are driven firmly and won't shift
- Top edges sit at the right elevation all the way around
- Nothing wobbles when you push on it
- The drainage slope you planned is still intact
- The edges can support screeding and finishing tools
Formwork that can't resist the pressure of wet concrete and foot traffic during the pour is formwork that's going to fail, it doesn't matter what material you're using.
Step 6: Don't Forget Joints and Reinforcement
Forms give the driveway its shape, but they're not the whole story. Control joints need to be mapped out ahead of the pour. For a standard 4-inch slab, industry guidance from Concrete Network points to joint spacing of roughly 10 feet, cut to about a quarter of the slab's depth. Your actual layout should flex depending on the driveway's shape and whatever your local codes call for.
Isolation joints matter too, especially where the new slab butts up against the existing garage floor and sidewalk. They let the two surfaces move independently instead of cracking against each other.
Rebar or wire mesh might come into play depending on soil and load conditions, but reinforcement doesn't make up for a thin slab, bad joints, or a poorly prepped subgrade. It's a supplement, not a fix.
Step 7: One Last Walkthrough Before the Pour
This is the step that saves people money.
Walk the entire perimeter looking for loose stakes, gaps, unsupported corners, and anything sitting at the wrong height. Confirm reinforcement is placed where the plans call for it and that the base underneath is properly compacted.
Keep watching once the pour starts, that's actually when the pressure on the forms peaks, especially around corners and long runs. If something starts to shift while the concrete's still workable, there's usually still time to fix it. Once it sets, you're stuck with whatever shape you've got.
Mistakes That Might Show Up
Using Bowed or Twisted Boards
Whatever shape the board has, the driveway edge inherits it. Check your lumber before it goes in the ground, not after.
Skimping on Stakes
Wet concrete is heavier and pushier than it looks. If you're not sure a section is braced enough, brace it more, don't assume the stakes you've already got are doing the job.
Treating Drainage as an Afterthought
A driveway can be perfectly straight and still send water exactly where you don't want it. Nail down the grade before you frame, not after.
Building on a Base That Hasn't Settled
If the ground under your forms shifts during construction, your elevations shift with it. Compact first.
Pulling Forms Too Soon
It depends on the concrete mix, the weather, and the cure. Pull them too early and you risk chipping edges that took real effort to get straight.
Can You DIY?
A short, straight, simple driveway is within reach for a lot of DIY homeowners with some patience and the right tools. Where it gets harder is when it involves steep grades, tight curves, drainage headaches, or a tie-in to a public street.
Check What you'd save doing it yourself has to be weighed against what it costs to fix a driveway that's already been poured wrong, which, in concrete, is usually a lot more than doing it right the first time would've cost.
Final Thoughts
Getting the materials and framing right doesn't just protect the structure. It also makes the finishing work easier and gives you cleaner, straighter edges to show for it. Whether you're starting from scratch or just comparing your options, understanding what goes into forms and framing puts you in a much better position to judge the work being done on your property.
If you'd rather have professionals handle the planning and installation from the ground up, Drivewayz USA offers driveway resources and services built to help homeowners make informed calls about their projects.
Frequently Asked Questions
They're the temporary boards or forming systems set up around the driveway area before the pour. They hold the wet concrete in place and define the slab's shape, size, edges, and final elevation.
Straight lumber is the go-to for most residential jobs. Plywood handles curves better. Metal and reusable forming systems show up more often on professional or repeat projects.
There's no fixed answer, it depends on the form material, slab height, whether there are curves, soil conditions, and how much pressure the concrete will put on the forms. Straight residential runs usually need tighter staking near corners, where movement is most likely.
No. They control shape and edges, not cracking. That comes down to subgrade prep, slab thickness, concrete quality, reinforcement, curing, drainage, and where the control joints are placed.
Only once the concrete has enough strength to hold its edges without chipping. Temperature, mix design, and curing conditions all affect the timing, so it's really a judgment call for whoever's running the job.